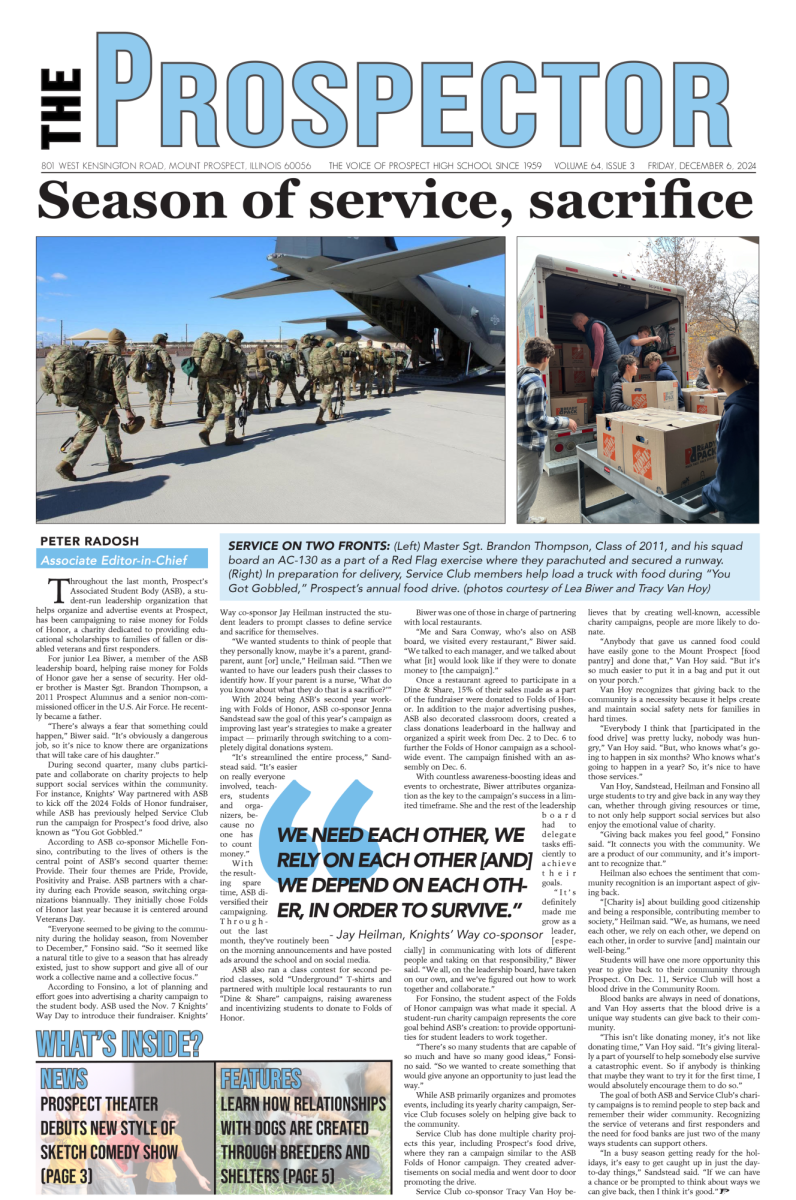
The Student News Site of Prospect High School

ProspectorNow

Let your voice be heard!
  • We love guest contributions! Contact Editor-in-Chief Brooke Michalczyk.
The Student News Site of Prospect High School

ProspectorNow

The Student News Site of Prospect High School

ProspectorNow

Weather


  • 5 AM
    35 °
  • 6 AM
    34 °
  • 7 AM
    33 °
  • 8 AM
    33 °
  • 9 AM
    33 °
  • 10 AM
    34 °
  • 11 AM
    35 °
  • 12 PM
    37 °
  • 1 PM
    37 °
  • 2 PM
    38 °
  • 3 PM
    38 °
  • 4 PM
    38 °
  • 5 PM
    37 °
  • 6 PM
    37 °
  • 7 PM
    36 °
  • 8 PM
    35 °
  • 9 PM
    34 °
  • 10 PM
    33 °
  • 11 PM
    32 °
  • 12 AM
    31 °
  • 1 AM
    30 °
  • 2 AM
    30 °
  • 3 AM
    29 °
  • 4 AM
    28 °
  • 5 AM
    28 °
March 17
38°/ 31°
Partly Cloudy
March 18
39°/ 27°
Overcast
March 19
51°/ 32°
Partly Cloudy
March 20
43°/ 34°
Sunny
March 21
42°/ 30°
Sunny
March 22
47°/ 36°
Partly Cloudy

Photoshop Dojo #2

By Heather Dove
Online Editor
Being artistic doesn’t come easy for everyone.  Long strokes of paint on a canvas or armed only by a pencil and a sketchbook, being creative can seem like a war zone.

Photoshop is the saving grace for anyone who is creative, but not necessarily artistic enough to do it themselves.  With a few clicks of a button, you can manipulate images into completely new pieces of art.  Even if you just want to mess around with your best friend by putting his head onto Eminem’s body, Photoshop will get the job done.

The best part is that anyone with a computer, time and a little imagination can become a Photoshop Ninja.

Starting in seventh grade, I’ve accumulated the knowledge that has qualified me to be dubbed a “Photoshop Ninja.”  Self taught, I’ve gone through the pitfalls so you don’t have to.  If there’s something you want to know how to do, comment below and ask me.  If I don’t already know how to do it, I’ll find out for you — your own personal Chacha to the graphics world.

Welcome to the Dojo

“Cut outs” refers to an image that doesn’t have a background.  In the underground world of elite Photoshop Ninjas, “cut outs” are referred to as “renders”.  So if you want to really look like you know what you’re doing, “render” is the appropriate term.  (However this is probably the equivalent of using the word “whom”.  While it is the correct term, anyone other than a grammar teacher might look at you like you’re from another world. Take pride in those weird glances though, you’re from an elite world.)

There is more than one way to accomplish a cut out, but some ways are more accurate than others.
As you read this tutorial, follow along with the steps.  You can use the images I provide for prac
tice, or use your own.
This is the tool bar, it is originally located on the left of your screen, and you have the options to move it anywhere.

The two tools that are outlined in red are mainly where the cut out tools are located.  If you look closely, you will see that under each picture there is a small black triangle.  If you right click (Right click for PC users, command and click for Mac users,) any image  on the toolbar that has this triangle, other tools that have similar functions will come up.  For example:

The above toolbar shows what it looks like when you right click (or command and click).
First, lets focus on the Rectangular Marquee Tool.  This is the dashed box in the first image:

Technically, this tool, as well as all of the other tools in the tutorial, are not meant to cut away.  More specifically, they select what you direct them to.
The Rectangular Marquee Tool selects parts of the image you’re editing in the shape of a box.
For this tutorial, I’ll be using this image to render:

My goal is to make a render (or cut out) of the ice cream in its bowl.  Now, using the Rectangular Marquee Tool, I can select the area closer to the ice cream.  When using this tool to select the are around the ice cream, your screen should look like this:

Everything on the inside of the box is what is automatically selected.  Since we want to get rid of the area outside of this box, we need to tell Photoshop to select the “Inverse”.   To do this, go to “Select”, “Inverse”.

Side note: When doing this make sure you are on the right layer, and that it isn’t a background layer (See “When Background Layers Lock You Out”).
Now that you’ve selected the inverse, cut or delete the background.  (You can do this by hitting the “delete” key.)
After you’ve cut out the background, it should be clear that the Rectangular Marquee Tool isn’t very accurate way to select things.  You still have the background around the ice cream, and as a final product we don’t want that.
So, it’s time to switch tools.  When you right click on the tool icon just under the Rectangular Marquee Tool, you should see these three options:

PRO’s and CON’s of the main three cut-out tools:

The Lasso Tool
PRO:
-fast to use
-allows you to get closer to the image than the Rectangular Marquee tool
CON:
-It’s a one hit wonder.  The second you let go of the mouse, it better be perfect.
-Forces the user to move quickly.
How to use:
Trace around the thing you want to render.  The second you let go, the computer will close up the remainder of what you traced, and select whatever is on the inside.  To get rid of the background, Go to “Select” on the menu, and chose the option “Inverse”.  Then hit delete. (See: “When background Layers Lock you out”)
Advanced Magnetic Tool
PRO:
-Fits to the edges of the object
-More precise than the Lasso Tool
-Quick
CON:
-When colors are similar, it will select the wrong thing.
How to use:
Trace around the thing you want to render.  Click often to put down “Anchors”, little squares that keep the tool from redoing (and possibly messing up) the are you have already done. When you are done tracing around the object, double click.  Go to “Select” on the menu, chose the option Inverse”, and hit delete in order to get rid of the background.  Again, if it doesn’t allow you to delete the background, see “When background Layers Lock you out” below.
Polygonal Lasso Tool
PRO:
-Saves time in the long run
-Get it done right the first time around
-Exact to what you tell it
-Can take your time
CON:
-Takes more user interaction than the Magnetic Tool
-Make take time to get use to
How to use:
Trace around the image you want to render.  I personally suggest that instead of tracing the whole image at once, you take it in sections.  Instead of selecting the whole image and deleting the inverse, we’re going to get rid of the chunks around the render.  So, you can take out chunk by chunk of background around the ice cream.  However if selecting the inverse works for you, you can trace around the entire render, and double click once you’ve ended where you started.
I’ve cut out the ice cream three times, each with a different tool.  These products shown are all after ONLY using the tool in one shot (for the polygonal lasso tool, I took out the chunks around it instead of selecting the inverse.  I did not however, go back and tidy it up).  When you’re using these tools you can always go back and touch up, but in order to prove what’s more time efficient, I haven’t gone back.  You can see the difference for yourself. . .

The product of the Polygonal Lasso Tool needs the least amount of touch up.  Maybe a bit of blurring, or a couple edges need to be cut off.

The Lasso Tool has far more excess background from the original that we don’t need.  It’s sloppy and doesn’t look professional.
The Magnetic Tool looks a little better in places.  In others, there is bits of background left over, and some chunks were taken out of what we wanted to stay.  Again, not at all what you’d want to see in a render.
The final tool that you can use, BUT NOT ABUSE, is the Magic Wand Tool.  I strictly only suggest this tool when working with backgrounds that are basic: consisting of only one or two solid colors.

To use this tool, simply select it, then click on the background color you wish to delete.  The Magic Wand tool will select every color similar to the color you clicked on as long as it touches a piece close to it.  (So if you select a red square in the top, and there is a red square in the other corner, but blue surrounds it, the second square would not be selected.)

This tool works best with simple backgrounds, for example an all white background.  The more colors that make up the background, the less clean the cut will be.

“When Background Layers lock you Out”

Somewhere on your screen there should be box that shows you all of the layers in the image.
If that is what you see, you will not be able to edit the image because it is locked.  This is easily fixed.
Duplicate the layer by going to “Layer”, “Duplicate Layer”.
Next, make the first layer invisible.  You can do this by clicking the image of an eyeball, and making it disappear.
From here you can either delete the background layer (I suggest that you don’t in case you make a mistake and have to start over), or keep it invisible.  However, make sure that you have selected the layer that is the copy, and only try to work on that.  In the image above, the “Background copy” layer is selected, as indicated by being highlighted in blue.
Photoshop automatically locks Background layers, which is why you cannot edit them.

If you still have any questions, or want to give some ideas for Photoshop tutorials, comment with them below!  I will reply to you via our Facebook page, http://www.facebook.com/#!/pages/Prospector-NOW/133493982748 .

Leave a Comment
More to Discover

Comments (0)

The email you enter will not be displayed on your comment.
All ProspectorNow Picks Reader Picks Sort: Newest

Your email address will not be published. Required fields are marked *